Determining the Lighting Requirement on Location
When first entering a room that is going to be the stage for the next set up you have to assess the situation in a number of ways. Let us take the situation illustrated bellow:
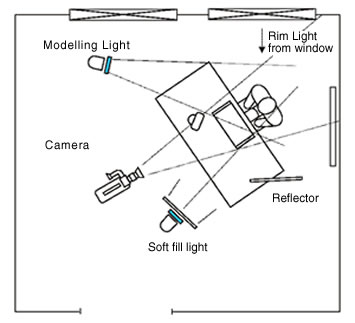 Fig.12 Location set-up Fig.12 Location set-up
- The walls are panelled in dark wood
- There are two medium-sized windows emitting daylight into the room.
- The scenery outside is not worthwhile including.
- The ceiling is white suspended tiles with embodied fluorescent down lighters.
- The desk is dark wood with green leather inset and a white blotter.
- There is a desk top light with an incandescent bulb and green shade.
- The floor has a fitted dark red carpet.
- There are plenty of power points.
The first thing to decide is the type of lighting required, and part of that decision depends not only on the personality and features of the person (or talent) in front of the camera, but also on the subject matter of the interview. To create a friendly, appealing atmosphere you should model and fill with soft light. On the other hand, for a hard factual or sales subject you should model with a little harder light and just infill with soft. This technique has the effect of bringing out the facial features that add power and authority to the character. You must decide if the view through the window should be featured and if the light coming in is useful. Here is a further choice: if the light coming in is not too bright you can 'blue-up' your photographic lights as well as the desk top light, if necessary. On the other hand, if it is too bright, you should filter the window using a Full-CT-Orange with a +ND content. Photographic lights can then be used unfiltered, effectively increasing their output.
The fluorescent lights in the ceiling should be filtered, but in this situation it might be preferable to turn them off and then, if required, bounce the camera top light off the white ceiling.
The furniture, carpet and wood panelled walls do not reflect light and therefore do not contribute to the reflected lighting effect. However, they do help when recording sound, as you get better quality without the liveliness of an otherwise empty room.
You will note in Fig. 12 that the desk has been set at an angle to the corner of the room. This has not been moved for the shoot; most offices have offset desks to take advantage of the natural daylight, and since we are also taking advantage of the incoming light the desk position is good. With the camera set up as in Fig. 12, the window light will be our key light, around which all others are secondary. Its function is to rim light the shoulders and head of the subject as well as lighting the background wall panelling. There may also be enough light from this window to use a reflector board, if required.
The next step is to set up the modelling light. Its position should be above the head height of the subject, then moved around in this area to achieve the desired modelling effect. Now it is time to soft light the shadows created by the modelling light either with your reflector board or your second stand light, complete with soft-light filter set of course. If the background looks too plain add a planter or a picture. It is quite acceptable to show only part of these so long as their position looks natural in the framed shot.
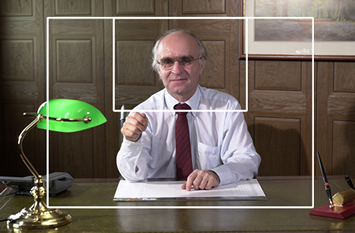
Fig. 13 The finished shot. It is possible to zoom-in on the subject if a shot has been well composed. |
|
|
The Kit Bag and Useful Accessories
The very nature of location work will have caused you to become a master of improvisation and adaptation. Many bits and pieces of your kit will have been assembled as the result of experiences on previous jobs. The kit bag invariably becomes a topic of conversation on any shoot; it also represents its owner's experiences and ability to adapt, find, devise, or even invent. In some cases these gadgets and adaptations have gone on to become manufactured and marketed as standard production items, while others were intended to be used for a totally different purpose. I have seen a wallpaper scraper as part of one kit; this was said to be ideal for pushing behind architraves in order to attach small fill-lights, or just to hold cable runs above the doorframe, off the floor and out of harms way.
Going on location with a few carefully chosen yet seemingly non-required bits and pieces will prove invaluable, and may ultimately save the day on one shoot or another. Such things include lighting spigot adaptors, gaff clamps, French flags and magic arms.
Down at the bottom of the bag you will have a collection of chalk, string, wire, gaff tape, camera tape, marker pens, bulldog clips, knives, side cutters, pliers; even an old wire coat hanger, which is a very useful source of strong wire.
One of the most useful accessories is the reflector board used for fill light situations. This can be as simple as a piece of white card or silver foil which has been crumpled, and then flattened and glued to a piece of card or hardboard. For most purposes the size only needs to be about 17ins x 23ins. There are, of course, a number of proprietary makes of reflector boards or materials on the market. There is one such device that has proved to be quite popular because it twist-folds down into a very small space.
To open it, you simply pull it from its pouch and shake it. A spring wire loop, seamed into its radius, unfolds with a whoop! Like magic, you have a soft silver fabric material stretched across a hoop, two feet in diameter. The advantage of the reflector material being rigidly suspended or mounted on a flat surface is that you can easily tip it, in order to aim the light exactly where you want it. |
|
|

